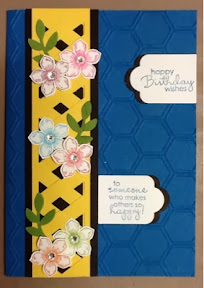
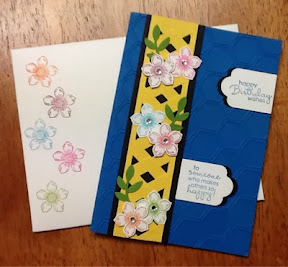
We had a fun morning at my card class today making this beautiful card.
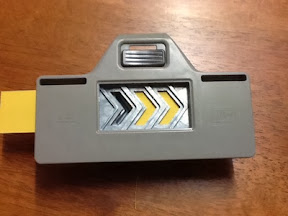
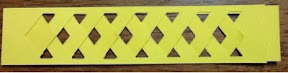
The lattice is made using the Chevron Border Punch (#132154). I cut 2 pieces of Daffodil Delight card (#121680) at 1& 1/4" x 5 & 3/4". Place the strip of card in the centre of the punch as shown, and punch.

Next, looking at the back of the punch, line up the card so that you are only cutting 2 chevrons - see below -
Then go to the other end and repeat.
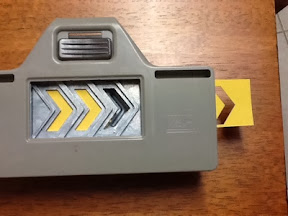
Do this on the 2 pieces of card.
Then place one piece on top of the other with the chevrons going in opposite directions.
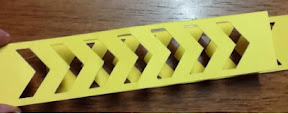
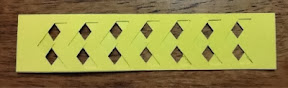
Then tuck in the points as shown. You can slide the 2 pieces of card to get the desired effect. Once you have the effect you want, tape the ends so they can't move.
I then attached this to the Basic Black card (#121688) and trimmed the Daffodil Delight to the same length as the black.
The base card is Pacific Point (#116202) which has been embossed with the Honeycomb folder (#129378). The flowers are from the Petite Petals stamp set (#133155) and punched with the Petite Petals punch (#133322). These are also available in a bundle (#134822) with a 15% saving. The leaves are punched with the Bird Builder punch (#117191) using Gumball Green card (#127543). The flowers and sentiments are stamped onto Whisper White card (#106549). The inks used are Melon Mambo (#126948), Pacific Point (#126951), Tangerine Tango (#126946), Tempting Turquoise (#126952), Real Red (#126949) and Gumball Green (#126861). Rhinestone Basic Jewels (#119246) add some bling to the centre of the flowers.
The sentiment is from Petite Pairs stamp set (#122497) and cut with a little tag from the Hearts a Flutter Framelits (#130159). I cut some black card also with the Framelits to give the "shadow" effect on the end of the tag.
To finish this project we made and decorated an envelope using the Envelope Board punch (#133774). This is such a great tool, as there are 66 different size envelopes that you can make with it. There are also other projects that can be made with it as well. I will do some of those when I get a chance.
That's all for today,
Till next time,
😊Happy Stamping😊
Lesley.
Lesley Jendra,
Independent Stampin' Up! Demonstrator.
www.lesleyjendra.stampinup.net
Email: lesleyjendra@bigpond.com.au
Posted using BlogPress from my iPad
No comments:
Post a Comment